Showing posts with label ivory. Show all posts
Showing posts with label ivory. Show all posts
Friday, April 17, 2009
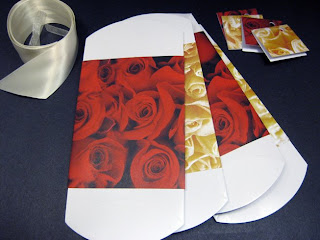
[Rosey Pillowboxes]
I think these pillow boxes would make great gifts for any occasion, such as wedding favors, baby or bridal shower favors, or gift wrapping for small gifts like candy or gift cards.
One piece of 12x12" scrapbooking paper was more than enough to decorate two boxes and I used some of the scraps to create coordinating gift tags. Ivory satin and organza ribbon leftover from my wedding added a finishing touch.
I look forward to making more of these! There is no end to the way these can be decorated to fit the occasion, whether with paper and ribbon or perhaps fabric and twine or even a felt wrap with a button closure.
Monday, June 9, 2008
Customizing a [Flower Girl Basket] x2
 I found a couple of basic baskets at the store, but they were kind of plain. I added some satin flowers, a pearl spray and ivory ribbon, and viola! One-of-a-kind flower girl baskets.
This was a very quick and easy craft project. I already had the flowers and pearl spray on hand because I found them at Michael's on clearance a few weeks ago. The satin flowers just happened to match the baskets perfectly! The ribbon actually came with the baskets as a tie on the outer packaging; I just untied it, ironed it, and made it part of the actual basket design.
Labels:
basket,
craft,
EpicTrinkets,
flower girl,
ivory,
pearl,
satin,
wedding
Monday, June 2, 2008
This [Card Box] takes the cake!
 This weekend I finished another one of my wedding craft projects. I made a box for cards that looks like a wedding cake!
Materials:
1 set of 3 hat boxes
1 roll of 1.5" blue organza ribbon
1 roll of 1" blue satin ribbon
2 feet of wired blue ribbon (optional)
1 tube of ivory acryllic paint
Tools:
- hot glue gun
- Craft knife
- Scissors
- Sponge paint brush
Basically I got three round nesting hat boxes from Michael's, cut holes in the tops of the bottom two boxes and a slot in the top box, painted them with acryllic paint, hot glued them together, then added decorative ribbon using double-stick tape. It was a fun, fast, and easy project.
3/24/09 Post-Wedding Update - The wedding cake-shaped card box served as functional decor at the gift table in the foyer as guest entered the church for our wedding. We received a lot of cards!

Picture by Siang of Lightphoria - www.lightphoria.com
Sunday, May 4, 2008
Enchanted [Handmade Garter]
I decided to make my own garter for my wedding because it looked simple enough... so I did! I finished it today. I sewed it by hand and used two different types of lace, some satin ribbon, and added bows, with a bead and sequin in the middle of the bow.
It was about a 2-3 hour project, I think, but spread out over 3 weeks since I just worked on it a little bit here and there while playing my favorite MMORPG (Massively Multiplayer Online Role-Playing Game) on my computer. Ah, what one can accomplish while sitting around waiting for raid leaders to finish distributing loot and then drone on about the strategy for slaying the giant monster in the next room.
3/24/09 - An After-the-wedding Anecdote: My sister caught my bouquet and her boyfriend caught the garter. Three months later he proposed and they are getting married in July!

pictures by Siang of Lightphoria - www.lightphoria.com
Subscribe to:
Posts (Atom)


