Crafters In Disguise

Showing posts with label paper. Show all posts

Sunday, June 13, 2010

Congrats Grads!


Two of my cousins just graduated from college and I am on my way to a family BBQ tonight to celebrate their success! We got them gift cards, and since I have like 200 plain white pillowboxes sitting around I had to decorate a couple to put the gift cards in. I decided not to use one of the pillowboxes I had decorated before because I wanted something that was brighter and more colorful and more appropriate for a congratulatory gift.

The scrapbooking paper I used for both of these boxes came from the same big stack. For each box I used two different coordinating papers. I made Peter's first, cutting out a 5-inch strip of the striped paper and wrapping it around the width of the blank box. The other paper I had was a bunch of squares so I wrote CONGRATS and PETER on two strips within the design, then cut them out and used double-sided tape to attach them to the box.


For Kari's box, I selected a nice spring green plaid and then I wanted to use a polka-dot paper to write CONGRATS and KARI. However, when I wrote out CONGRATS it was longer than the box because there was a lot of white space between the dots. Taking a tip from my sewing knowledge I decided to box pleat the paper, in effect making the word pop up away from the background. I think it turned out pretty cool!

Saturday, April 18, 2009

On a /roll


Decorating the first group of pillowboxes was so much fun last night that I continued the project today and tried some different colors and styles. Mother's Day is coming up (my mom loves purple!) as well as several birthdays in our family. If I don't plan a gift ahead of time, there's always the last-minute gift card and if I already have these little boxes decorated, they would be a great way to quickly wrap up a gift card (with room to spare for a handful of candy!).


Friday, April 17, 2009

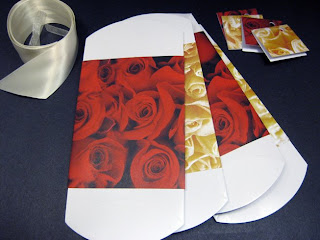
[Rosey Pillowboxes]

I think these pillow boxes would make great gifts for any occasion, such as wedding favors, baby or bridal shower favors, or gift wrapping for small gifts like candy or gift cards.
One piece of 12x12" scrapbooking paper was more than enough to decorate two boxes and I used some of the scraps to create coordinating gift tags. Ivory satin and organza ribbon leftover from my wedding added a finishing touch.

I look forward to making more of these! There is no end to the way these can be decorated to fit the occasion, whether with paper and ribbon or perhaps fabric and twine or even a felt wrap with a button closure.

Wednesday, April 15, 2009

Schnazzy [Push Pins]


I saw these on Etsy and decided I wanted to make my own! I found some old tacks in a bag of stuff from my elementary school days and I had glass stones leftover from my wedding centerpieces so I didn't need to buy anything at all. I cut out little circles from some scrapbooking carstock, glued them to the back of the stones with Mod Podge, then (because I couldn't find any better glue) used white glue to attach the stone to the tacks. With some other paper and a piece of cardboard I made a coordinating board to stick them on so they would be easy transport to work without poking myself.

Sunday, April 12, 2009

Happy Easter!


Bunnies and eggs are for kids! I decided to stick with a spring floral theme for these Easter cards. Pastels and bright colors helped bring Spring to the cloudy gray rainy Sunday.

Friday, July 25, 2008

Got [Escort Cards]?


photo by Siang of Lightphoria - www.lightphoria.com

Escort cards are a popular means to guide guests to which table they are supposed to sit at for your wedding reception dinner. It is possible to buy cards by the pack that you can print on, but this can be really expensive, like 50 cents to more than a dollar per card.

Making your own escort cards is a little time-consuming but it is a rather simple process and can save you a lot of money. Handmade cards are also a nice personal touch.

To make 200 escort cards I bought a stack of card stock from the PaperZone for around $20 and I ended up using up less than half of the paper supply. My other tools and supplies were items that I already had on hand: art markers, a caligraphy pen a shaped punch, ruler, and paper cutter.