Crafters In Disguise

Wednesday, December 30, 2009

Dipped in Chocolate

Homemade treats are a quick and easy holiday gift to do in bulk. I bought a bunch of graham crackers and cookies and dipped them in melted chocoloate, added sprinkles, then packaged them up and delivered them to hungry recipients for Christmas. This was also a quick way to put together gifts for all of my extended family on Christmas Eve. It only took one evening in the kitchen to complete the whole project by myself and the results were nothing short of yummy!

The goodie bags came in a pack of 2 dozen for only a couple dollars at Target. I made the gift tags myself and tied them on with satin ribbon and a jingle bell for flair.


Monday, November 2, 2009

Book Review: The Gathering Storm

I have been waiting for this book ever since I finished reading the last of Robert Jordan's Wheel of Time series and discovered that the author had passed away prior to completing the final installment of this epic saga. Brandon Sanderson is releasing the last book as three separate novels and after seeing the size of this one I am happily looking forward to all the nice long hours I will spend enjoying the final two books.

I finished reading The Gathering Storm this weekend, possibly due to the fact that I had nothing better to do on Halloween. Once I started reading this I did have a hard time putting it down and only the Harry Potter-esque thickness of the tome kept me from finishing it 24 hours after bringing it home.

Brandon Sanderson did a wonderful job of keeping the story feeling like Robert Jordan's work. His interpretation of the characters, places and storyline fit in exactly with how I expected things to be and I was able to immerse myself in the story without any distraction of being aware that someone other than Robert Jordan had penned the words.

However, Brandon Sanderson did make use of one technique that I felt worked well coming from him that would not have felt right if it had come from Robert Jordan - now and again he would revisit places and events from the earlier volumes. In a way it felt like a tribute to Robert Jordan's work but also served the purpose of coming full circle and building up towards the impending goosebump-enducing ending to the epic.

I loved how the story ended; after it just seemed to get darker and darker, finally there is a ray of hope shining through that makes me look forward to what will happen next. However, it's making me think that in contrast the second book of the final trilogy should end up with an Empire Strikes Back type of cliffhanger ending to lead into the final book. But I'm going to have to wait to find out!

Tuesday, September 8, 2009

Book Review: Elantris

This Labor Day weekend I read Elantris by Brandon Sanderson.

I decided to read this book because I enjoyed Robert Jordan's Wheel of Time series and Brandon Sanderson will be writing the final installment since Robert Jordan passed away before finishing the last book. I thought it would be best to familiarize myself with Brandon Sanderson's work prior to the release of the next Wheel of Time novel.

I like to rank books by how I read them. I either a) love them and can't put them down, b) enjoy them but find it a little tedious to get through them, c) stop reading them and never finish them, or d) never start reading them in the first place because they don't appeal to me at all. To my delight, Elantris was an "a"-category book.

It's not a book I would read again right away, but it was a very enjoyable one-volume fantasy story that had the epic feel I enjoy. As the story went along I found myself expecting and predicting how the plot would turn out in the end quite easily, but this did not take away from the enjoyment of reading it through. There were enough surprises thrown in as well to make things interesting.

It's hard not to compare his writing to Robert Jordan's even though this was his first novel, but I felt like Brandon Sanderson dealt with plot better than characters, but he did a great job of tidying up the ending of the story and not letting it come to abruptly. Fortunately Robert Jordan has already established the characters in the Wheel of Time series very well, and what is needed for the final trilogy is plot development and a tidy, climactic ending. After reading Elantris I am really looking forward to The Gathering Storm.

Friday, July 3, 2009

[Whimsical Willow] on the Water


I just finished this painting today. It's sort of like a willow tree on the edge of a little green river with a forest on the opposite bank. I liked the pink accent color against the greens so I added some flowers.

We raided Ulduar last night, wiping for three hours while trying to kill Thorim on Hard Mode. This allowed for a lot of downtime so I set up my little easle in front of my second monitor and painted while raiding.


You can actually see the forest background better in this picture. I thought it looked awesome before I painted a tree on top of it, but I had to put some sort of object in the painting. It's actually really easy to paint trees like this. I start with a solid green background and let it dry. Then feather in some black around the edges on top, then mix some green and black and slop on some vertical lines like trees. Before it completely dries, add in lighter shades of green to create depth (highlights) to define individual tree trunks. I used a similar process when I did that purple Night Elf forest painting a while ago.

Tuesday, June 30, 2009

Must-Have iPhone Apps

Having recently bought an iPhone, I have been relentlessly searching for new apps to download from the iTunes App Store, especially free apps. So far I have come across a few that I really enjoy. Some are useful, some are informative, and some are merely hillariously amusing. Here are my favorites:

Apps that are useful for staying up-to-date:

TweetDeck (FREE) - Excellent Twitter interface.

WootWatch (FREE) - Check what's up for sale on the Woot sites.
Facebook (FREE) - A simple Facebook interface.

Apps that can make you look smart:

Tipulicious (FREE) - Calculate tips and split bills.
Dictionary (FREE) - Includes a thesaurus and dictionary.
Keeper (FREE) - Track passwords in one place under one PIN.
Shazam (FREE) - Identify songs you hear.

Apps to help you get ahead (especially fashion designers!):

Fasio Network (FREE) - View the latest collections of top designers.
TouchCloset (FREE) - Catalog your clothes and accessories.
Units (FREE) - Quick measurement conversions.

Lose It! (FREE) - Weight loss goal and calorie intake tracker.

Apps that you will get a kick out of:

SmackTalk ($.99) - Instantly make people laugh.
EggShaker (FREE) - Not quite the same as the real thing.
Lightsaber (FREE) - Turns your iPhone into a lightsaber.

StickWars Lite (FREE) - The best free iPhone game ever.
BubbleWrap (FREE) - You know you want to pop bubbles.
Fluid (FREE) - It looks and acts like water when you touch it.

Monday, June 29, 2009

[Priest Costume] update

The sleeves are finished now except for the gold details. I plain to paint the swirls on using fabric paint. I bought several shades so I can add some depth to the designs. I will try out all of the colors on scraps first because I'm not sure how thick the paint should be or what it will look like after it dries. It would be horrible to just start painting directly on the sleeves and then have it turn out really ugly. So my planned process is:

1. Trace the design onto a piece of tagboard or cardstock to make a stencil. Label one side "right" and one side "left" so I can make sure it will be mirrored exactly on the left and right sleeves.

2. Test the paint on scrap pieces of the purple satin fabric to make sure it bonds well and looks good. Also test the design to figure out which colors to use and how to add depth with highlights and lowlights.

3. Pin the design stencil onto one sleeve and paint on the design. After it dries (if paint got on the stencil), flip the stencil and do the other sleeve.

The lower half of the robe is closer to completion now too. The side seams are finished, including adding a zipper. I am currently working on the bottom hem. I am sewing yellow double-fold bias tape along the bottom hem to give it the gold border at the bottom. The added stiffness should also make the hem less flowing so it is more like a robe than a skirt. Once this is done I should be able to paint the designs on at the same time (and via the same process) as the designs on the sleeves.

Once the sleeves and skirt are complete I will probably start focusing on the side panels or finish the top. I may save the top for last because I could decide to skip some of the back details and opt for a cloak instead.

Friday, June 26, 2009

Putting Crafts to Work


My push pins that I made a while ago out of glass marble rocks and scrapbook paper have made themselves useful at work. I often have notes and Post-Its all over my desk so it has been helpful to use tacks to paste notes on the wall and clear up desk space.

I've had this little box for a long time and I think it has gone through at least four different color schemes by now. I decided to bring it to work and fill it with stacks of Post-It Notes, headphones, glass wipes... all sort of things that had been hiding behind my monitors. Now they are out of sight but still within reach when I need them!

Tuesday, June 9, 2009

[Resurrection] on Unfinished Projects

Lately I haven't had much to post about because I've been focusing on finishing some projects. Yesterday I finished a second drawstring damask bag for my sister's wedding so she and her husband-to-be will both have one to collect money in for their "money dance" at the reception.

Raiding in the World of Warcraft has also taken up a lot of my free time because my guild on Gorgonnash is working on hard-mode content in Ulduar on 10-man and trying to kill Yogg-Saron in the 25-man group. I scored tickets to BlizzCon so I am considering working on finishing my Tier 4 priest costume as soon as I finish a couple of other projects related to my sister's wedding.

I began the purple-and-gold priest costume about a year and a half ago, but projects for my own wedding began to consume my crafting hours. Moving also meant that I had to redefine my crafting space and I have a hard time spreading out and working on large sewing projects in our condo because there isn't a lot of space. I don't like leaving my stuff in my husband's way when I am in the middle of a project.

After BlizzCon last year I also decided that I want to take an easier approach to the designs on the priest robes and paint them on with fabric paint instead of sewing on applique. It should be a lot less time-consuming and still look great. It's a costume after all, not a couture dress.

Here are some shots of the construction when I was working on the costume in my old apartment. I have the top and skirt cut out and pieced together. I created a pattern for the collar but it will need a lot of reinforcing to get it to stick up correctly. I think I will attach it to the top via snaps instead of sewing it in.


The sleeves are almost finished, except for the gold details which I might paint on instead of using fabric. I am debating whether to create a crop jacket or sew the sleeves directly into the top. I think a crop jacket could be a more interesting way to put the outfit together, and I could attach the collar to the jacket as well.

Tuesday, May 19, 2009

Painting [Cherry Blossoms]


I haven't had a lot of time to work on crafts over the last week but I did manage to do a little painting. I'm not sure that I am done with this one or not, but here's what it looks like so far! I feel like I need something on the top, but I'm not feeling inspired right now. Perhaps I will come back to it later. I like the color combination of aqua and red though.

Thursday, May 7, 2009

Somewhat Abstract


So I had this huge tube of metallic silver paint and wondered how it would look as a background color. I slapped some on, then grabbed some eggplant color and it sort of grew organically from there. I love this color combination.

Wednesday, May 6, 2009

Etsy Favorites Promotion #6: AdoptanAlien


This is where science fiction meets... plushies! I love these collectible little critters! Their big eyes just say "zomg, aren't I cute?" and the variety of colors means you could be sure to find one that would look right at home at your place. There are so many unique aliens with different personalities and names, some with three eyes, two heads, or even with their tongue hanging out.

They come from all over the Universe and even distant Galaxies. They are all strange and one of a kind. But, most importantly, they are all looking for a good home! These little Aliens are all orphans and are up for Adoption at the Adopt an Alien Agency. For a small adoption fee you can bring one of these sweet little aliens into your home. Adopt your Alien Today! http://www.adoptanalien.etsy.com/

Tuesday, May 5, 2009

Painting the Spring


I ran out of mounted canvases so this was painted using acryllics on canvas paper. Mary Blair's artwork served as inspiration (it was an easy transition from Eyvind Earle since both painted Disney animation concept art). I really like the combination of orange and aqua blue, so after starting with an aqua-colored background I decided that had to be sky, so why not have a blossoming orange tree? I also felt that the clouds in the sky were a little lonely without a few white doves frolicking in the breeze.

Thursday, April 30, 2009

Tree in the [Grass]


I received a request from a friend to do a tree painting for her using the elements she liked from my previous tree paintings. So this is what I came up with based off of the following criteria she presented me with:

- whimsical like the Eyvind Earle trees
- mysterious (not obvious) background
- light-colored background but not too light
- "green is good"

Having learned a lesson from my last painting, I started this one by painting the background. I liked how subtle vertical stripes fading into the background color can look like trees in a fog, so I started with fat green vertical stripes blending into a yellow background and then painted over them with another layer of yellow.

Next, I added in the grass in several layers of shades of green but decided that the grass really should be the foreground, so after painting on the tree silhouette I repainted a lot more grass over the bottom of the tree. The nice thing about grass is you can keep adding on as many layers as you want and it keeps giving the illusion of more and more depth.

Wednesday, April 29, 2009

Etsy Favorites Promotion #5: fringe


When it comes to trend-setting fashion, fringe clearly stands out. This Etsy designer takes scarves to the future by offering a variety of neck-warming fashions that are sure to turn heads. I love these fashion-forward cowls, scarves and shrugs - they come in a variety of styles and colors and could be easily dressed up or dressed down.


This is what I call soft and warm, attractive and functional, wearable art!

The items in my shop are hand-crocheted, knit, sewn, and/or embroidered with care. My creations are original designs I create and they include scarves, cowls, capelets, shrugs, shawls, lariats, ensembles and so much more. Expect an occasional surprise among the items I create. There are many types of styles in my shop. From dramatic couture fashion to urban prairie and lots of styles in between. I always create these items with the idea that they will give their owners a divine self-confidence just by wearing them. - Dennice from fringe

Monday, April 27, 2009

Etsy Favorites Promotion #4: LovingLeeCrafted


LovingLeeCrafted was one of the first Etsy sellers that I added to my favorites because of these whimsical fairy doors. I think it would be a lot of fun to turn a backyard garden into a mystical fairyland by adding doors and miniature fairy furniture among plants and stones so they look almost like they grew there.

The paint job and details on these doors is what makes these stand out as a work of art. Lisa also sells paintings and other wooden pieces like buttons (which would be a gorgeous natural accent to a piece of clothing or a purse or even rustic home decor), but where her painting and woodwork comes together is where you can see that real magic happens!


Imagination and love, two most important ingredients in any craft. I believe I capture both in everything I create. I use a variety of techniques from carving, painting, wood burning, crocheting…the list goes on and on. I try to make every item fun, friendly and decorative. Most recently I’ve indulged in the art of making fairy doors. I spent many years as a youngster reading and dreaming of the faerie folk but then grew up. I missed the mischievous, innocent, honorable people. I invited the fey into my life and it has improved immensely so I'm offering the same opportunity to you! Many of the fey folk will bring with them luck, good wishes and a happy helping hand. Provide them with a door into the mortal world. Keep a look out, I’m always creating something new and exciting and most importantly, something I can be proud of. - Lisa
pictures by LovingLeeCrafted

Sunday, April 26, 2009

Upcycling [Plastic Bags]

After reading this article on Etsy I decided to try my hand at fusing plastic bags. This process creates a thicker plastic that you can use as a fabric similar to vinyl or polyurethane. The article covers the process in greater detail, but basically you just iron several layers of bags together between sheets of paper.


After ironing the layers together, I trimmed the edges then decided to make a little pencil pouch out of the "fabric" I had created.


You can't tell from the picture because I shot it from its good angle, but the pouch is totally lopsided because I failed to make a pattern first or do any measuring first. It's ugly but functional! I only used half of the plastic so I might make something else later too. This took 6 plastic bags from my hoard under the kitchen sink. It's better than having them all end up in a landfill!

Friday, April 24, 2009

Etsy Favorites Promotion #3: lolashowgirl

Lolashowgirl is a Victorian-inspired, steampunk clothing line all handmade by Laura Ann.


She makes modern clothing with a unique, eye-catching twist. It's like adding a touch of costume to your every-day clothes in a trendy way that doesn't overstep the "wierd" line. I could totally see myself wearing one of these tank tops with a pair of jeans.

The Gothic couture wrap caught my eye, and I love that it's pictured with a simple white tank top, letting the potential buyer realize that this could be worn not just as a cover-up with a strapless gown on a special occasion, but for a trip to the mall or a night out to dinner with friends. This piece was definately a "heart-worthy" Etsy find.

"I design and sew all types of clothing from bridal wear to couture, and unique tanks!" - Laura Ann

Thursday, April 23, 2009

Into the Woods of Teldrassil


The enchanting forest home of the Night Elves was the first area of Azeroth that I encountered when I began playing World of Warcraft.

This painting has been sitting on my easle for over a week now. Today I managed to finally add the last touches and get it to a finished state. I'm not completely happy with it but it was fun to paint on two different canvases and I think it at looks pretty good from a distance at least.

I painted this using acryllics on primed canvas with an in-game screenshot for reference.

Wednesday, April 22, 2009

Etsy Favorites Promotion #2: DotandLine


DotandLine is today's featured Etsy shop. Gone are the days of boring white lamp shades! These graphic prints will turn a boring necessessity into a fabulous feature of any room, and whether your style is modern, rustic, traditional, retro, or totally unique, if you can't find it already in their shop, a custom lampshade is sure to be the right choice for your space.


Here's what Annie from DotandLine has to say about her company:

Hello from Dot&Line Home Accessories. We are a small but growing company! My name is Annie Bierma and I am the owner/founder. I have my degree in Theatre Lighting Design and now find my joy in designing pieces that allow you to add your own story to a room.

As a company, we do our best create pieces inspired by nature, vintage materials and light itself. We try to keep our designs as "green" as possible, reusing materials and lamp bases as much as possible. Using hand printed and vintage fabrics also keeps our footprint small and results in one of a kind, handmade items you can't find anywhere else.

In addition to making pieces inspired but us directly, we also enjoy collaboration with individuals to create something that is uniquely "them". This guarantees that our clients get exactly what they want and need for their space and nothing makes us happier!

Tuesday, April 21, 2009

Etsy Favorites Promotion #1: RedHarp

Since I don't always have a new craft to blog about, I decided to start promoting sellers and items in my Etsy favorites, particularly items I have "hearted" that haven't sold in a while or sellers that I think are worth promoting.


RedHarp is a seller I know personally so she gets to be first! Not only is she skilled with a sewing machine, but she is also quite crafty - she once showed me that it is possible create a lightsaber out of plumbing parts and without the need for power tools.

RedHarp's Etsy Shop contains a variety of items including colorful fabric shopper bags and purses in many different fun themes, and of course you shouldn't go without the handy purse organizers! Her bags are great catch-alls for shoppers and convention-goers and the fun prints just scream personality and uniqueness. She doesn't mass-produce these so you can be sure a lot of love and careful work went into each one.

I know some of you love the beauty of the English countryside so you should definately check out her photography.

She also offers clever glass photo pendants that should satisfy both Steampunk fans and the SCA. These are made by attaching a tiny photography behind a glass stone so the glass magnifies the photo (similar to the [Push Pins] I made a few days ago). In particular think the pendants that have pictures of circuit boards are fabulous idea!

Saturday, April 18, 2009

On a /roll


Decorating the first group of pillowboxes was so much fun last night that I continued the project today and tried some different colors and styles. Mother's Day is coming up (my mom loves purple!) as well as several birthdays in our family. If I don't plan a gift ahead of time, there's always the last-minute gift card and if I already have these little boxes decorated, they would be a great way to quickly wrap up a gift card (with room to spare for a handful of candy!).


Friday, April 17, 2009

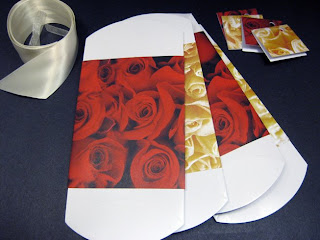
[Rosey Pillowboxes]

I think these pillow boxes would make great gifts for any occasion, such as wedding favors, baby or bridal shower favors, or gift wrapping for small gifts like candy or gift cards.
One piece of 12x12" scrapbooking paper was more than enough to decorate two boxes and I used some of the scraps to create coordinating gift tags. Ivory satin and organza ribbon leftover from my wedding added a finishing touch.

I look forward to making more of these! There is no end to the way these can be decorated to fit the occasion, whether with paper and ribbon or perhaps fabric and twine or even a felt wrap with a button closure.

Wednesday, April 15, 2009

Schnazzy [Push Pins]


I saw these on Etsy and decided I wanted to make my own! I found some old tacks in a bag of stuff from my elementary school days and I had glass stones leftover from my wedding centerpieces so I didn't need to buy anything at all. I cut out little circles from some scrapbooking carstock, glued them to the back of the stones with Mod Podge, then (because I couldn't find any better glue) used white glue to attach the stone to the tacks. With some other paper and a piece of cardboard I made a coordinating board to stick them on so they would be easy transport to work without poking myself.

Sunday, April 12, 2009

Happy Easter!


Bunnies and eggs are for kids! I decided to stick with a spring floral theme for these Easter cards. Pastels and bright colors helped bring Spring to the cloudy gray rainy Sunday.

Friday, April 10, 2009

She calls it a [Money Bag]


My sister asked me to make this for her, I hope it is what she had in mind! It's a black and white damask cotton bag with a hot pink ribbon drawstring.

Not a Boomkin.

Rowr!

I found this blank plastic toy at the San Diego Comic-Con last summer and decided I would jump on the "draw on a blank toy" bandwagon. It took me a while to figure out what to do on this one. The shape is interesting and the top piece is actually seperate from the base. I originally thought I would paint on it with acryllics but I decided to try out the Sharpies.

I drew my inspiration from my level 28 druid in the World of Warcraft. After shifting into kitty form I left my character on the screen and started doodling away on this blank canvas.

Saturday, March 28, 2009

Hug this [Tree]!

I painted this tree today based off of another Eyvind Earle piece. I love his whimsical style. This painting is on an 8x10 canvas, done in acryllic paints. I used water to help blend the colors in the background.

Cards for all Occasions


A friend of mine hosted a crafting party today and showed us how to make these adorable cards using Stampin' Up! paper products and scrapbooking tools.

Crafting parties are a great way to spend time with friends and by having a project pre-designed and ready to go, everyone was able to participate equally regardless of artistic ability and we all went home with two practical creations.

Friday, March 27, 2009

Playing with Colors


I painted a couple smaller 8x10 pictures to try out some different techniques and ideas. The smaller canvases are inexpensive and great for a beginner like myself. I could even paint over them and reuse the canvas later.

Wednesday, March 25, 2009

[Green Striped Handbag]

This handbag is green in more ways than one. I made it out of one upcycled green striped placemat (4 for $2.50 on clearance at Target), a bamboo purse handle I had sitting around, and some vintage(?) matching lace trim that my grandma gave me years ago when cleaning out her closet. The lining is a special order fabric sample from JoAnn's that I scored when the store in Redmond was closing down.

This is actually my first purse, and I had to hand-sew it due to my current lack of a working sewing machine. A couple things I would have done differently in hindsight would be to add a little pocket inside on the lining, and perhaps try to extend the lining up and add a zipper so it can be completely closed.

Monday, March 16, 2009

A [Tree on Canvas]

Michaels had some canvases on sale today so I decided to bust out the acryllics and try my first painting on canvas. Normally I just use my acryllics to paint little wood boxes, plastic blasters and Jedi comlinks, stuff like that. So for my first painting on canvas I decided to draw inspiration from one of my favorite artists, Eyvind Earle.

I started painting the background and just layered on the green then mixed in some black and came in from the edges with strokes to look like grass or vines.


After getting the background the way I wanted it and letting it dry, I found a picture of an Eyvind Earle painting online and basically tried to copy it without getting as detailed. His lines are too painstakingly perfect for my patience so I took a more impressionistic approach and focused more on getting the idea of the shadows and highlights conveyed. I like how it starts with a silhouette but adds the contrasting white highlights to give the tree some depth. A lot of amateur artists are doing the black tree silhouette-on-a-colored background thing right now. It's easy and can look great in a modern room. I will probably hang this painting in my bedroom.

Thursday, March 12, 2009

Tastes like Chicken


I don't cook every night, but when I do I like to keep it quick and simple. Steamed asparagus compliments this Indian dish that is easily created with a jar of sauce, a pound of chicken breast, and steamed white rice.

Sunday, March 8, 2009

Green is the new purple

I made a few little things this weekend while reorganizing my craft area. In the interest of "going Green", I tried to use up some things I already had.

This was a white kitchen towel I had found at Target for $1. It's very simple and basic, but looks much better with some appliqué and embroidery. It is completely hand-sewn because my sewing machines are both misbehaving.


I started by drawing the design on some scratch paper, then I traced over the leaves on velum and created a template for five or six different leaf shapes that I then used to trace onto some green linen that I already had. Prior to cutting the linen I ironed on lightweight interfacing to the back of the fabric. Lastly I penciled the design onto the towel, stitched the main vine then contined one leaf at a time until finished.

Our kitchen bar tends to collect an assortment of pens and pencils. I tried to make a place for them in the craft drawers, but a handful still ended up on the bar counter space in an ugly flourescent yellow plastic cup. I decided I needed to make something that matched the rest of the kitchen better.
I found this wooden cup at Michael's and brushed on a thin layer of "eucalyptus" acryllic paint. I like seeing the wood grain beneath the paint. Adding the leaf design from the kitchen towel in white was an easy choice.

Looking back I think I would prefer green-on-white rather than white-on-green, and I may just paint over this some day. For now, it looks cute and serves its purpose well. I think something like this could make a nice gift for a coworker or a male family member that is difficult to shop for - perhaps in a different design though.

Lastly, I used some of the same green linen as well as some old felt scraps and fiber fill that I had sitting around, and a button leftover from a quilting project to create this little emery. I actually did need a place to stick all of my "in use" needles. I have a drawer for assorted needles from sewing machine needles to embroidery needles but I usually have two or three that are currently in use for hand-sewing projects and they typically end up getting mixed in with my pins or stuck in the fabric of my ironing board.

I love how this turned out and I think I might make more, I certainly have a lot of these materials left over. Next time I want to try using a large hole punch to cut out the flower(s) though, I think that would look even better. For this one I hand-sketched a design on paper, then traced it on velum to create a template.